FAQ
HYPACKに関する質問
11.ユーティリティ(Utilities)
ID.Q11-7
Q. チャンネルコンディション(水路状況)プログラムの使用(Using the Channel Condition Program)[英語]
A.
At the time of the HYPACK® Max release, the Channel Conditions Program was still in the developmental stages. Since then, the program has been completed and is going into beta testing so I thought I'd provide you with an update.
The changes from the original program have to do with the channel and reach properties.
Setting your Channel Properties:
Enter the Channel Properties by selecting CHANNEL-PROPERTIES or clicking [CHANNEL]. The Channel Properties dialog will appear.
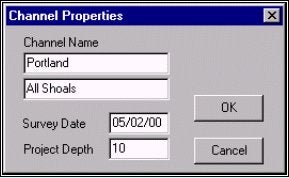
The Channel Name can be any name you choose with 2 lines available.
The Survey Date represents the day(s) when you conducted the survey upon which the report is based.
The Project Depth is assigned to the entire channel. You can "over-ride" this value for an individual reach by right clicking on the reach divider handle on the map and selecting PROPERTIES. A dialog will be displayed in which you may edit the settings for that reach.
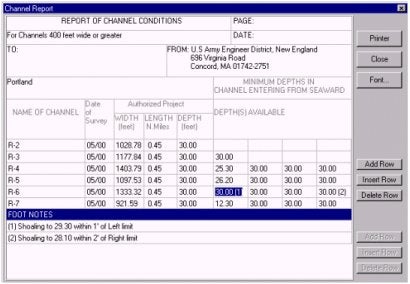
The choices regarding the report have been removed. Working with the U.S. Army Corps of Engineers, we have developed a simpler option controlled through the reach properties.
Setting your Reach Properties:
Right click on its handle and select PROPERTIES. The Reach Editor will appear.
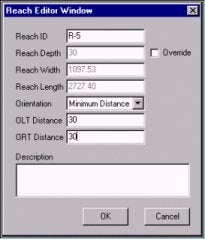
Reach ID specifies which divider is described. You can change the name if you wish.
Reach Depth displays the channel depth from that divider to the next. Check Override to enable a change in the depth for that segment only and type in the new depth.
Reach Width and Length are displayed, but may not be edited.
Orientation offers 3 choices:
-
Minimum Distance positions the divider at the angle where it crosses the shortest distance between the outside left and right lines of the channel.
-
Perpendicular positions the divider perpendicular to the outside lines.
-
Set Angle enables you to set the angle at which the divider crosses the channel.
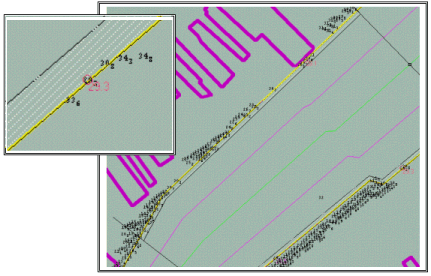
OLT (Outer Left) and ORT (Outer Right) Distances may be specified for each reach. This option creates longitudinal lines at the specified distances, parallel to the left and right toe lines respectively. If these are created, the report generated will exclude the data in these zones from the available depths for the channel. The shoalest depth in these zones, if less than project depth, will be footnoted. Excluding the distance along the shore acknowledges and defines sloping banks, and focuses the report on the center, navigable area.
The newest feature of the Channel Conditions Program involves the Outer Left and Right Distances.
If these values are left at "0", the report will be created as it was before, presenting the controlling depths in each reach (and for each segment if you chose a segmented Channel Type).
If these values are greater than "0", the shoreline zones will be drawn. They are displayed on your screen as a gray, shaded area.
The report generated will then include only the unshaded, center area, footnoting the controlling depths of the shoreline zone(s).